In this guide, I will try to explain how to set up a Docker Swarm system that is completely highly available. In total we need to setup five Ubuntu-Server machines (3x Docker machines; 2x HAProxy machines).
Components to make Docker Swarm high available:
- By default volumes of Docker containers are not synchronized between the docker swarm machines. To overcome this limitation we are installing GlusterFS on all three docker swarm machines. INFO: Wikipedia: GlusterFS is a distributed file system that presents storage elements from multiple servers as a unified file system.
- As a reverse proxy we are installing Nginx Proxy Manager as a container on our Docker Swarm.
- For a graphical interface to manage our Docker Swarm we are installing Portainer as a container on our Docker Swarm.
- We need a external load balancer to distribute all incoming request to one of our three Docker machines. Therefore we are setting up HAProxy on two Ubuntu-Server machines.
- Additionally we are installing Corosync and Pacemaker on the two HAProxy machines. With Corosync and Pacemaker we are making the HAProxy high available. Furthermore Corosync and Pacemaker are helping us to setup a virtual IP address. On this virtual IP address all our network traffic from our Docker Swarm containers are going in and out.
Requirements for VMs
- A disk dedicated for ubuntu operating system. (20GB or more)(For the three docker swarm nodes 50 GB or more).
- All 5 machines should be in the same IP subnet (low-latency).
- For the three docker swarm VMs I recommend at least 4GB RAM.
Content
- Topology
- 1. Install Docker Swarm
- 2. Build Docker Swarm
- 3. Install GlusterFS
- 4. Install Portainer
- 5. Install Nginx Proxy Manager
- 6. Install HAProxy
- 7. Install Corosync/Pacemaker (Virtual IP 192.168.0.97)
- 8. Perform port forwarding on your router
- 9. (Optional) Set up demo web server as service
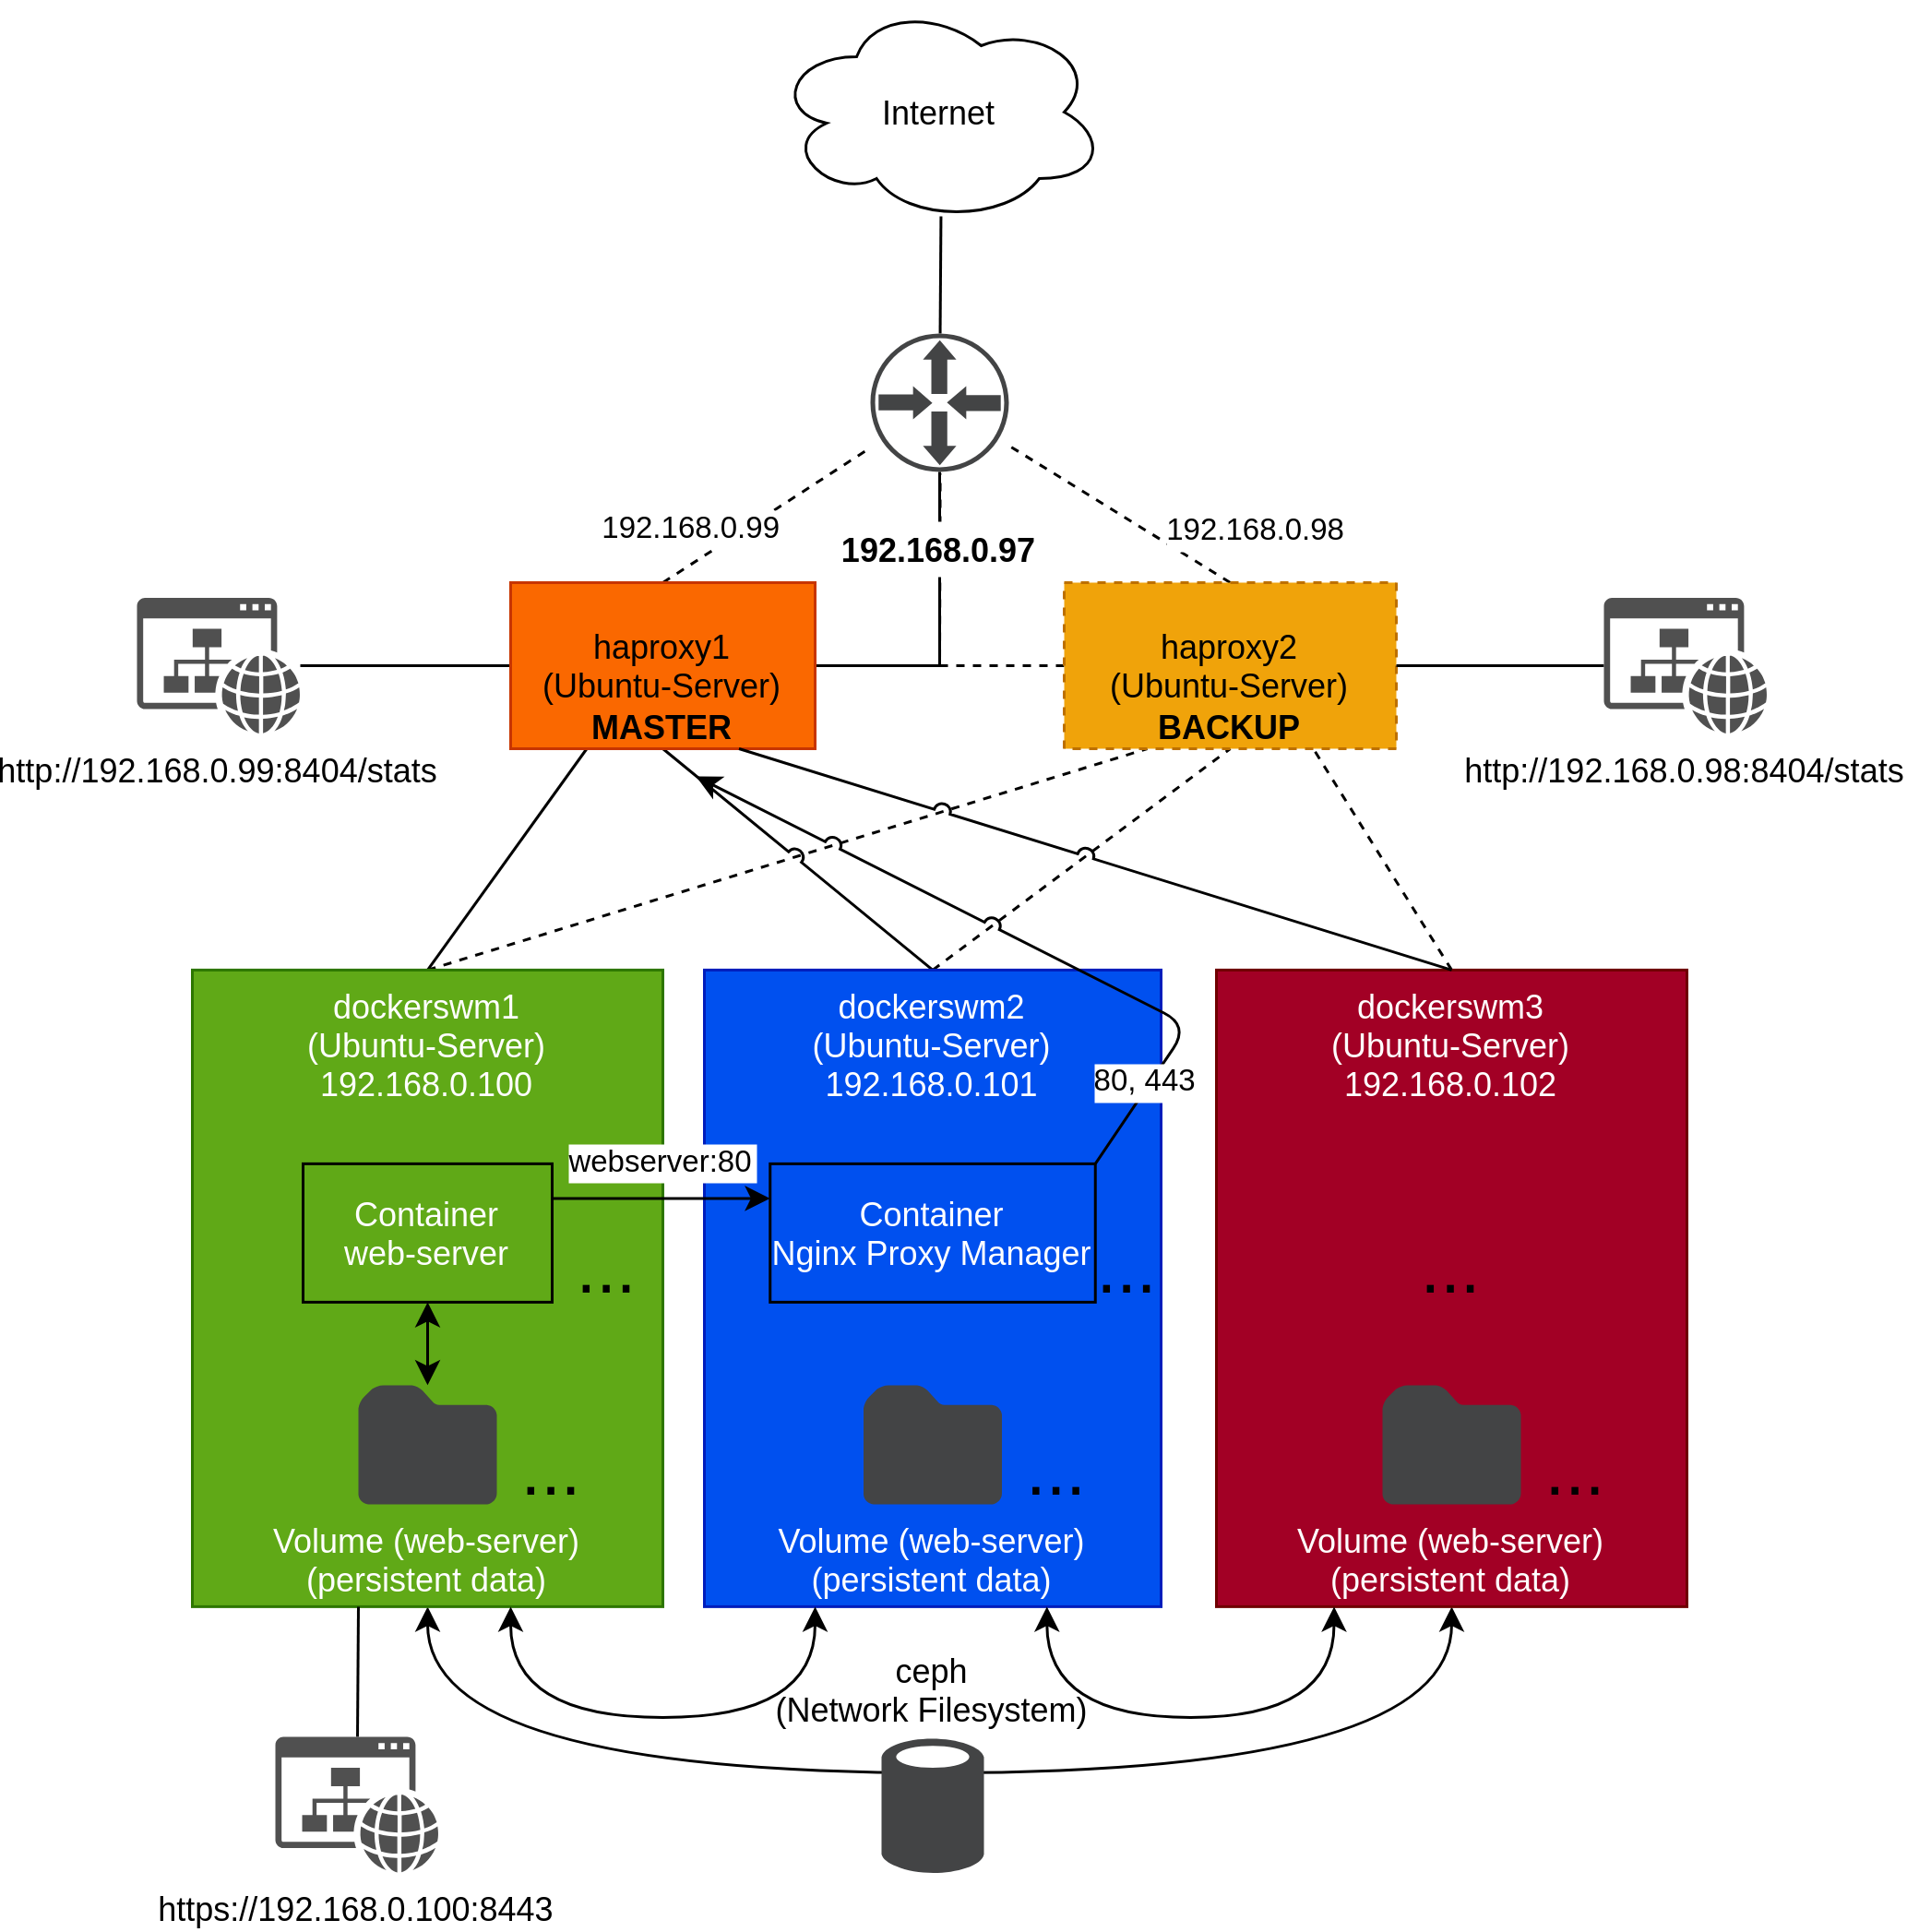
Topology
1. Install Docker Swarm
Good documentation can be found on Docker docs: https://docs.docker.com/engine/install/ubuntu
After installing ubuntu-server on all three machines proceed to install some packages wit `apt:
The following commands are repeated for the following systems (dockerswm1; dockerswm2; dockerswm3):
sudo apt update -y
sudo apt install ca-certificates curl gnupg lsb-release -y
Add the official Docker GPG keyrings:
The following commands are repeated for the following systems (dockerswm1; dockerswm2; dockerswm3):
sudo mkdir -p /etc/apt/keyrings
curl -fsSL https://download.docker.com/linux/ubuntu/gpg | sudo gpg --dearmor -o /etc/apt/keyrings/docker.gpg
Add the Docker repository:
The following command is repeated for the following systems (dockerswm1; dockerswm2; dockerswm3):
echo \
  "deb [arch=$(dpkg --print-architecture) signed-by=/etc/apt/keyrings/docker.gpg] https://download.docker.com/linux/ubuntu \
  $(lsb_release -cs) stable" | sudo tee /etc/apt/sources.list.d/docker.list > /dev/null
Install Docker:
The following commands are repeated for the following systems (dockerswm1; dockerswm2; dockerswm3):
sudo apt update -y
sudo apt install docker-ce docker-ce-cli containerd.io docker-compose-plugin -y
2. Build Docker Swarm
Good documentation can be found on docker docs: https://docs.docker.com/engine/swarm/swarm-mode
INFO: There are two different roles that a Docker machine takes in a Docker swarm
- Manager: Delegates tasks to the worker nodes. Takes over administrative tasks. Also takes over functions of a worker node.
- Worker: Performs common tasks of a worker node, e.g. provisioning and operating containers.
In this tutorial we are adding all the Docker machines as Manager to the Docker Swarm.
dockerswm1 (192.168.0.100) init Swarm
Initialize the Docker Swarm:
!!! Only on machine dockerswm1 !!!:
sudo docker swarm init --advertise-addr 192.168.0.100

sudo docker swarm join-token manager
//////////// Example output to add Manager-Node: ////////////

    docker swarm join \
    --token SWMTKN-1-59egwe8qangbzbqb3ryawxzk3jn97ifahlsrw01yar60pmkr90-bdjfnkcflhooyafetgjod97sz \
    192.168.0.100:2377

/////////////////////////////////////////////////////////////
dockerswm2 (192.168.0.101) add to Swarm as Manager
Now the machine dockerswm2 is added to the swarm as an additional manager node:
Please add the machine as Master-Node to the docker swarm !!!
!!! Only on machine dockerswm2 !!!:
docker swarm join \
    --token SWMTKN-1-59egwe8qangbzbqb3ryawxzk3jn97ifahlsrw01yar60pmkr90-bdjfnkcflhooyafetgjod97sz \
    192.168.0.100:2377
dockerswm3 (192.168.0.102) add to Swarm as Manager
Now the machine dockerswm3 is added to the swarm as an additional manager node:
Please add the machine as Master-Node to the docker swarm !!!
!!! Only on machine dockerswm3 !!!:
docker swarm join \
    --token SWMTKN-1-59egwe8qangbzbqb3ryawxzk3jn97ifahlsrw01yar60pmkr90-bdjfnkcflhooyafetgjod97sz \
    192.168.0.100:2377
OPTIONAL: Check if docker nodes are connected to each other
sudo docker node ls3. Install GlusterFS
Good documentation can be found on GlusterFS documentation page: https://docs.gluster.org/en/latest/Install-Guide/Install and https://docs.gluster.org/en/latest/Install-Guide/Configure/#partition-the-disk
In this step, a GlusterFS is installed on each of the three machines (dockerswm1, dockerswm2 and dockerswm3). This service is used to synchronize the persistent data of containers (volumes). This is necessary because by default persistent data is not synchronized between nodes in a Docker Swarm.
Installation of GlusterFS:
The following commands are repeated for the following systems (dockerswm1; dockerswm2; dockerswm3):
sudo apt install glusterfs-server -yFormat the partition:
Assuming you have an empty disk at /dev/sdb: (You can check the partitions on your system using sudo fdisk -l)
And then create a single XFS partition using fdisk Format the partition:
The following commands are repeated for the following systems (dockerswm1; dockerswm2; dockerswm3):
sudo mkfs.xfs /dev/sdbCreate a directory where you will mount the device:
The following commands are repeated for the following systems (dockerswm1; dockerswm2; dockerswm3):
sudo mkdir /mnt/glusterfs
sudo mount /dev/sdb /mnt/glusterfs
Add to /etc/fstab for automatic mounting:
The following commands are repeated for the following systems (dockerswm1; dockerswm2; dockerswm3):
sudo -s
echo "/dev/sdb /mnt/glusterfs xfs defaults 0 0"  >> /etc/fstab
exit
The hostnames and IP addresses of all machines are now entered in the /etc/hosts file on all machines. Thus everyone knows everyone.
The following commands are repeated for the following systems (dockerswm1; dockerswm2; dockerswm3):
echo "192.168.0.100 dockerswm1" | sudo tee -a /etc/hosts
echo "192.168.0.101 dockerswm2" | sudo tee -a /etc/hosts
echo "192.168.0.102 dockerswm3" | sudo tee -a /etc/hosts
After that, the GlusterFS daemon service must be started and activated on all machines:
The following commands are repeated for the following systems (dockerswm1; dockerswm2; dockerswm3):
sudo systemctl start glusterd
sudo systemctl enable glusterd
Now we create a memory cluster, starting with one of the machines and adding the others with this command:
!!! Only on machine dockerswm1 !!!:
sudo -s
gluster peer probe dockerswm2
gluster peer probe dockerswm3
gluster pool list
exit
Now we create a second folder (/mnt/dockerswarmvol) in which we mount the GlusterFS volume so that containers can store their persistent data there.
The following commands are repeated for the following systems (dockerswm1; dockerswm2; dockerswm3):
sudo mkdir /mnt/dockerswarmvolNow the replication-volume is set up over all three Docker Swarm machines. I for example set the replication-volume name to staging-gfs:
!!! Only on machine dockerswm1 !!!:
sudo gluster volume create staging-gfs replica 3 dockerswm1:/mnt/glusterfs dockerswm2:/mnt/glusterfs dockerswm3:/mnt/glusterfs force
sudo gluster volume start staging-gfs
The volume is now ready to use, but we need to make sure that the volume is mounted again on reboot (or under other circumstances). We will mount the volume to the /mnt/dockerswarmvol directory. This is done by issuing the following commands on all machines:
The following commands are repeated for the following systems (dockerswm1; dockerswm2; dockerswm3):
sudo -s
echo 'localhost:/staging-gfs /mnt/dockerswarmvol glusterfs defaults,_netdev,backupvolfile-server=localhost,noauto,x-systemd.automount 0 0' >> /etc/fstab
mount.glusterfs localhost:/staging-gfs /mnt/dockerswarmvol
chown -R root:docker /mnt/dockerswarmvol
exit

#(Optional: Verify if mount was successful)
df -h
You can now create new files in the directory /mnt/dockerswarmvol, which will then be synchronized to all machines.
4. Install Portainer
Portainer is a container for managing Docker containers via a graphical web interface.
Create a folder for the Portainer container (persistend data) (container volume):
!!! Only on machine dockerswm1 !!!:
sudo mkdir /mnt/dockerswarmvol/portainerNow a YAML file (docker-compose) is created to start the Portainer container in the Swarm environment. Please use nano to create the file portainer.yaml file and fill it with the code contained in the following code block and save it.
!!! Only on machine dockerswm1 !!!:
nano portainer.yamlInsert the following content into the nano editor, save the file and close the nano editor:
services:
  agent:
    image: portainer/agent:sts
    volumes:
      - /var/run/docker.sock:/var/run/docker.sock
      - /var/lib/docker/volumes:/var/lib/docker/volumes
    networks:
      - agent_network
    deploy:
      restart_policy:
        condition: any
        delay: 5s
        max_attempts: 3
        window: 120s
      mode: global
      placement:
        constraints: [node.platform.os == linux]

  portainer:
    image: portainer/portainer-ce:sts
    command: -H tcp://tasks.agent:9001 --tlsskipverify
    ports:
      - "9443:9443"
      - "9000:9000"
      - "8000:8000"
    volumes:
      - /mnt/dockerswarmvol/portainer:/data
    networks:
      - agent_network
    deploy:
      restart_policy:
        condition: any
        delay: 60s
        max_attempts: 3
        window: 180s
      mode: replicated
      replicas: 1
      placement:
        constraints: [node.role == manager]
networks:
  agent_network:
    driver: overlay
    attachable: true
Now the Portainer container is started with the following command:
!!! Only on machine dockerswm1 !!!:
sudo docker stack deploy portainer -c portainer.yamlNow we access the Portainer web interface in a browser and we define a secure password for the admin user. We can call the Portainer web interface on all three IP addresses of the Docker Swarm but it does not matter which IP address we choose.
https://192.168.0.100:9443
or
https://192.168.0.101:9443
or
https://192.168.0.102:9443
5. Install Nginx Proxy Manager
Nginx Proxy Manager is a modern HTTP reverse proxy that makes deploying microservices easy.
Now we need to create a overlay network on the docker swarm cluster like so:
!!! Only on machine dockerswm1 !!!:
sudo docker network create --driver overlay --attachable nginx_ingressCreate a folders for the Nginx Proxy Manager container (persistend data) (container volume):
!!! Only on machine dockerswm1 !!!:
sudo mkdir /mnt/dockerswarmvol/nginxproxymanagerstack
sudo mkdir /mnt/dockerswarmvol/nginxproxymanagerstack/npm_data
sudo mkdir /mnt/dockerswarmvol/nginxproxymanagerstack/npm_letsencrypt
First we open the Portainer web interface in our web browser:
https://192.168.0.100:9443
or
https://192.168.0.101:9443
or
https://192.168.0.102:9443
It does not matter which IP address you use to access the Portainer web interface.
Now we create a stack:
The name of the stack can be freely defined.
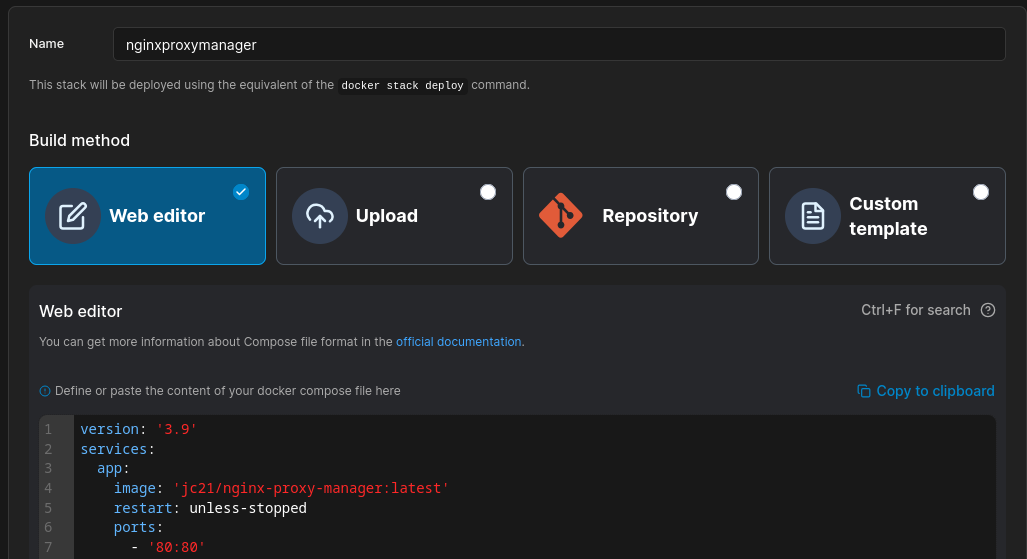
Now we insert the content of the following code-block in the web editor of Portainer and deploy the stack (docker-compose).
services:
  app:
    image: 'jc21/nginx-proxy-manager:latest'
    restart: unless-stopped
    ports:
      - '80:80'
      - '81:81'
      - '443:443'
    volumes:
      - /mnt/dockerswarmvol/nginxproxymanagerstack/npm_data:/data
      - /mnt/dockerswarmvol/nginxproxymanagerstack/npm_letsencrypt:/etc/letsencrypt
    networks:
      - nginx_ingress

networks:
  nginx_ingress:
    external: true
Now we access the Nginx Proxy Manager web interface in a browser and we login with the default email admin@example.com and default password changeme. Immediately after logging in with this default user you will be asked to modify your details and change your password.
http://192.168.0.100:81
or
http://192.168.0.101:81
or
http://192.168.0.102:81
It does not matter which IP address you use to access the Nginx Proxy Manager web interface.
6. Install HAProxy
For our running Docker Swarm, we now need an external load balancer so that network traffic can be distributed across all three machines. In addition, the HAProxy can detect a failure of a Docker Swarm machine and can temporarily stop serving network to the failed machine.
Install HAProxy:
The following commands are repeated for the following systems (haproxy1; haproxy2):
sudo apt install -y haproxyThe configuration file of the HAProxy (/etc/haproxy/haproxy.cfg) is edited as follows to allow load balancing between dockerswm1, dockerswm2 and dockerswm3 (Please append the content of the following code-block to the existing /etc/haproxy/haproxy.cfg file):
Each HAProxy comes with its own web monitoring interface http://192.168.0.99:8404/stats respectively http://192.168.0.98:8404/stats. These web interfaces are secured by a username/password pop-up. these line defines a username and password in the following code-block stats auth <username:password>. Please define your own username an password !!!
More information about the HAProxy monitoring web interface can be found on the following page: https://www.haproxy.com/blog/exploring-the-haproxy-stats-page
sudo nano /etc/haproxy/haproxy.cfg
# Configure Stats-Webpage of HAProxy on Port 8404
frontend stats
    mode http
    bind *:8404
    stats enable
    stats uri /stats
    stats refresh 10s
    stats admin if TRUE
    stats auth admin:password

frontend nginx-notls
        bind *:80
        mode tcp
        option tcplog
        default_backend nginx-notls

frontend nginx-tls
        bind *:443
        mode tcp
        option tcplog
        default_backend nginx-tls

backend nginx-notls
        mode tcp
        option tcplog
        option tcp-check
        default-server inter 10s downinter 5s rise 2 fall 2 slowstart 60s maxconn 250 maxqueue 256 weight 100
        balance         roundrobin
        server          dockerswm1 192.168.0.100:80 check
        server          dockerswm2 192.168.0.101:80 check
        server          dockerswm3 192.168.0.102:80 check

backend nginx-tls
        mode tcp
        option tcplog
        option tcp-check
        default-server inter 10s downinter 5s rise 2 fall 2 slowstart 60s maxconn 250 maxqueue 256 weight 100
        balance         roundrobin
        server          dockerswm1 192.168.0.100:443 check
        server          dockerswm2 192.168.0.101:443 check
        server          dockerswm3 192.168.0.102:443 check
Now we restart the haproxy.service to activate the changes we made:
sudo systemctl restart haproxy.serviceINFO: Incoming requests arriving on port 80 and 443 at the HAProxy are forwarded (round robin method) to the dockerswm1, dockerswm2 and dockerswm3 machines. On the Docker Swarm, Ngix Proxy Manager is running on one of the Docker Swarm machines. Nginx Proxy Manager is the internal reverse proxy for the other containers on the Docker Swarm.
7. Install Corosync/Pacemaker (Virtual IP 192.168.0.97)
Pacemaker is an open source cluster manager application. Corosync is a cluster engine for Pacemaker and crmsh is a Python-based tool for managing a Pacemaker cluster.
Install Pacemaker, Corosync and crmsh. After that, the services "corosync" and "pacemaker" are temporarily disabled.
The following commands are repeated for the following systems (haproxy1; haproxy2):
sudo apt install -y pacemaker corosync crmsh
sudo systemctl stop corosync
sudo systemctl stop pacemaker
Now corosync is configured on both machines. But first a backup of the default configuration file is made and then the new configuration file is created:
The following commands are repeated for the following systems (haproxy1; haproxy2):
sudo mv /etc/corosync/corosync.conf /etc/corosync/corosync.conf.backupNow we create the file /etc/corosync/corosync.conf as follows
sudo nano /etc/corosync/corosync.confand paste the content of the following code-block in the nano file editor and save the file.
The following commands are repeated for the following systems (haproxy1; haproxy2):
# Please read the corosync.conf.5 manual page
totem {
    version: 2

    # Corosync itself works without a cluster name, but DLM needs one.
    # The cluster name is also written into the VG metadata of newly
    # created shared LVM volume groups, if lvmlockd uses DLM locking.
    cluster_name: lbcluster

    # crypto_cipher and crypto_hash: Used for mutual node authentication.
    # If you choose to enable this, then do remember to create a shared
    # secret with "corosync-keygen".
    # enabling crypto_cipher, requires also enabling of crypto_hash.
    # crypto works only with knet transport
    crypto_cipher: none
    crypto_hash: none

    interface {
        ringnumber: 0
        bindnetaddr: 192.168.0.97
        broadcast: yes
        mcastport: 5405
    }
}

logging {
    # Log the source file and line where messages are being
    # generated. When in doubt, leave off. Potentially useful for
    # debugging.
    fileline: off
    # Log to standard error. When in doubt, set to yes. Useful when
    # running in the foreground (when invoking "corosync -f")
    to_stderr: yes
    # Log to a log file. When set to "no", the "logfile" option
    # must not be set.
    to_logfile: yes
    logfile: /var/log/corosync/corosync.log
    # Log to the system log daemon. When in doubt, set to yes.
    to_syslog: yes
    # Log debug messages (very verbose). When in doubt, leave off.
    debug: off
    # Log messages with time stamps. When in doubt, set to hires (or on)
    timestamp: on
}

quorum {
    # Enable and configure quorum subsystem (default: off)
    # see also corosync.conf.5 and votequorum.5
    provider: corosync_votequorum
    two_node: 1
}

nodelist {
    # Change/uncomment/add node sections to match cluster configuration
    node {
        # Hostname of the node
        name: haproxy1
        # Cluster membership node identifier
        nodeid: 1
        # Address of first link
        ring0_addr: 192.168.0.99
    }
    node {
        # Hostname of the node
        name: haproxy2
        # Cluster membership node identifier
        nodeid: 2
        # Address of first link
        ring0_addr: 192.168.0.98
    }
}

service {
  name: pacemaker
  ver: 0
}
Now the Corosync service and Pacemaker service are activated:
The following commands are repeated for the following systems (haproxy1; haproxy2):
sudo systemctl start corosync
sudo systemctl enable corosync
sudo systemctl start pacemaker
sudo update-rc.d pacemaker defaults 20 01
sudo systemctl enable pacemaker
OPTIONAL: Query status of the cluster:
sudo crm status
sudo corosync-cmapctl | grep members
Now the cluster is configured. To do this, execute the following commands on haproxy1.
!!! Only on machine haproxy1 !!!:
sudo crm configure property stonith-enabled=false
sudo crm configure property no-quorum-policy=ignore
sudo crm configure primitive virtual_ip ocf:heartbeat:IPaddr2 params ip="192.168.0.97" cidr_netmask="32" op monitor interval="10s" meta migration-threshold="10"
8. Perform port forwarding on your router
Now all that remains is to set up and enable port forwarding on your router for port 80 and 443 for the virtual IP address 192.168.0.97.
Also setup a dynamic DNS on your router. There are many dynamic DNS provider ( https://www.noip.com, https://www.duckdns.org, ...) that can translate your public IP address of your router to a predefined Domain name you can define.
Comparison of different dynamic DNS provider: https://www.ionos.de/digitalguide/server/tools/dyndns-anbieter-im-ueberblick/
9. (Optional) Set up demo web server as service
In this step, we will deploy a demo web server as a service in the docker swarm using Portainer and Nginx Proxy Manager.
First we open the Portainer web interface in our web browser:
https://192.168.0.100:9443
or
https://192.168.0.101:9443
or
https://192.168.0.102:9443
It does not matter which IP address you use to access the Portainer web interface.
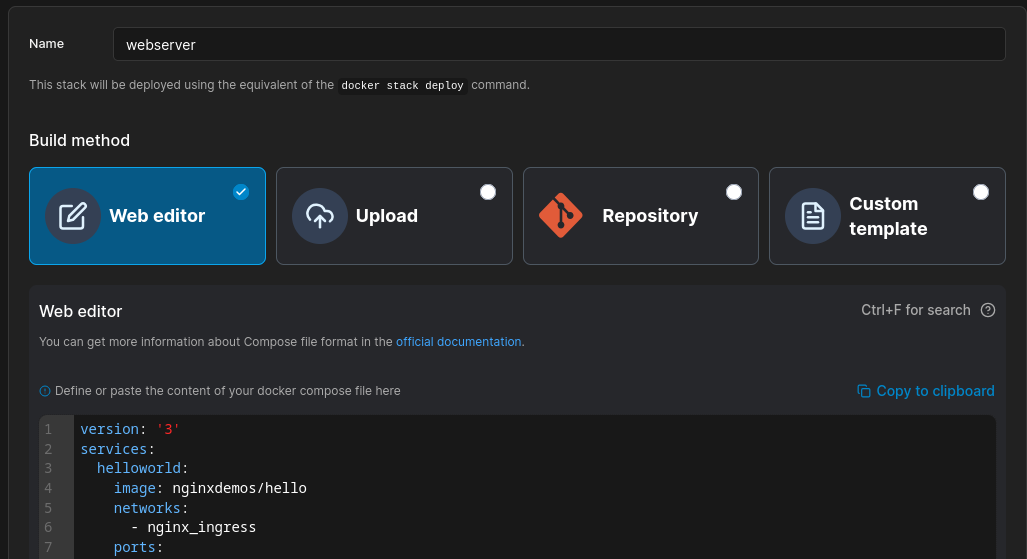
Now we create a stack:
The name of the stack can be freely defined.
Please always use the nginx_ingress overlay network for ALL your services, so that Nginx Proxy Manager can communicate with your services
-
If the service requires a persistent volume you need to create a folder in the GlusterFS shared folder BEFORE you deploy the stack via portainer
Example:
sudo mkdir /mnt/dockerswarmvol/<FOLDER_NAME>Example part inside the YAML config:
services:
...........................................
   volumes:
     - /mnt/dockerswarmvol/<FOLDER_NAME>:/var/www/html
...........................................
Now we insert the content of the following code-block in the web editor of Portainer.
services:
  webserver:
    image: nginxdemos/hello
    networks:
      - nginx_ingress
    ports:
      - 8082:80
networks:
  nginx_ingress:
    external: true
Now we access the Nginx Proxy Manager web interface
http://192.168.0.100:81
or
http://192.168.0.101:81
or
http://192.168.0.102:81
It does not matter which IP address you use to access the Nginx Proxy Manager web interface.
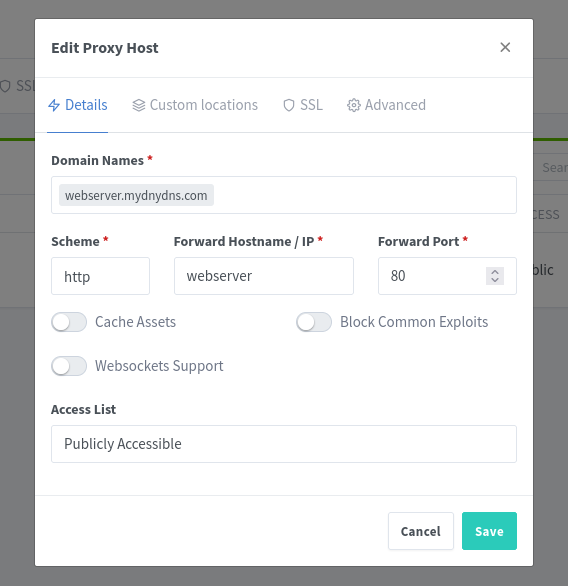
In the top menu bar click on the option Hosts and then on Proxy Hosts. Now we need to click on the button Add Proxy Host on the right side of the empty table
Please modify the Domain name webserver.mydnydns.com to youre own domain name!!!
Because the Nginx Proxy Manager-container and the webserver-container
services:
  webserver: <---- This is the service-name of the container
...............
(demo web server) are using the same overlay network, the service-name and the internal port of the demo web server container is used in the proxy-host-config like so: